Data Cables & Pinout
Mount the sensors first
Do not cut and terminate these cables until the sensors are mounted. Their positions decide where each run ends and how long it has to be: Current Sensor and Temperature Sensors.

The four ethernet cables connect to XREG-010 via two dual jack ethernet ports, RJ5 (left) and RJ3 (right).
Each jack receives a Cat6 cable.
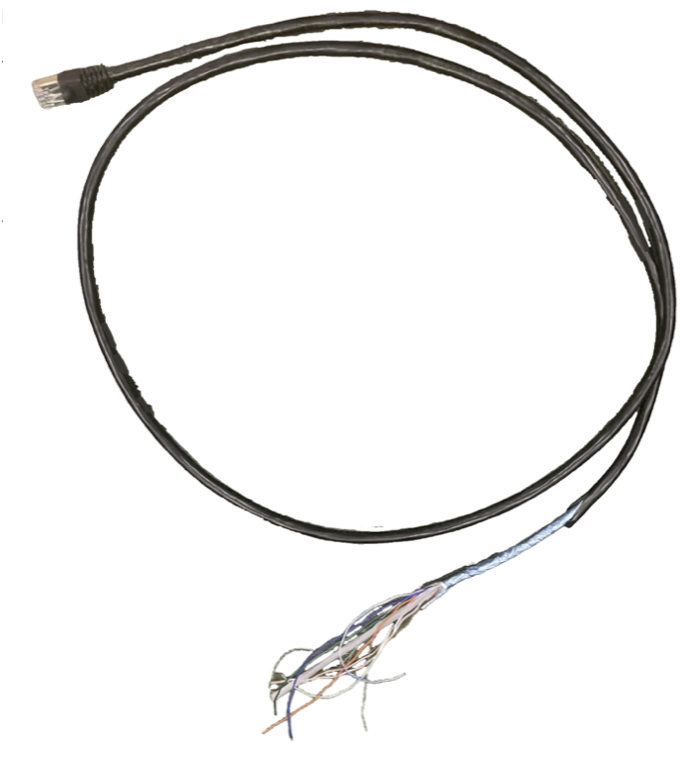
Make four cables by cutting two patch cables in half, so that each has an ethernet connector on one end and 8 bare wires on the other (for connection to the boat, sensors, etc.)
Picking the cable
Use a straight-through, stranded Cat6 patch cable (the recommended cables).
- Wire colors: T568B, T568A, and how to confirm yours (a signal on the wrong pin can destroy the board)
- Straight-through vs crossover
- Shielded cable: ground one end only
- Dielectric grease on assembly
Wire Termination on the Boat Side
Sherco makes a series of 26–24 AWG crimp connectors which work well.
Splicing a Cat6 conductor into boat wiring
Cable 1, Alternator Area
RJ5, left port · pins 1–8 (from left to right)
| Required | Pin | Wire (T568B) | Signal | GPIO | Purpose | Connects to | Connector / termination |
|---|---|---|---|---|---|---|---|
| 1 | Orange/White | 3.3V | — | 3.3 V power for the digital temperature sensor(s) | The red lead of every DS18B20 on the bus | HSWBS-10 26–24 AWG adhesive heat-shrink butt splice, crimped straight onto the sensor lead. No step-up, no pigtail. | |
| 2 | Orange | GND | — | Ground for the digital temperature sensor(s) | The black lead of every DS18B20 on the bus | HSWBS-10 26–24 AWG adhesive heat-shrink butt splice, crimped straight onto the sensor lead. No step-up, no pigtail. | |
| 3 | Green/White | TEMP-DQ | — | Digital temperature sensor(s) signal: one DS18B20 data line shared by every probe | The white lead of every DS18B20 on the bus | HSWBS-10 26–24 AWG adhesive heat-shrink butt splice, crimped straight onto the sensor lead. No step-up, no pigtail. | |
| 4 | Blue | TACHIN | — | Alternator stator tap for RPM. Please ground this wire if unused (left open it picks up noise) | The alternator's stator terminal, usually marked W, STA, Stator or AC | Fuse this wire at the end that taps. 1 A ATO blade fuse (Sherco ATO1A on 12 and 24 V, OptiFuse ANR80-UL-1A on 36 and 48 V) in an 18 AWG in-line holder: Sherco IHWO18 on 12 and 24 V, OptiFuse LPR-02B-18R on 36 and 48 V. Join the regulator-side holder lead to the Cat6 conductor with one HSWSD-10: its small end takes the 24 AWG, its large end the 18 AWG. At the stator terminal, crimp HSRR10M-10 multi-stud ring (#10, #8, and #6 in one terminal), or HSRFN-10 for a 0.250" male blade, straight onto the holder’s 18 AWG lead. No fold-back. If you are not using RPM, ground the conductor as the Purpose column says and fit no fuse. | |
| 5 | Blue/White | 5V | — | 5 V power for the alternator current sensor | Terminal 1 (+5 V) on the current sensor's 4-pin screw plug | KF2EDGK-5.08-4P-AA: strip the Cat6 conductor and clamp the bare copper under the screw. No splice, no ferrule, and do not tin the wire. | |
| 6 | Green | GND (AIN3) | — | The current sensor's power ground. Ground only because AIN3 is factory-shorted to ground by R28; removing R28 turns this pin into an analog input. | Terminal 2 (power ground) on the current sensor's 4-pin screw plug | KF2EDGK-5.08-4P-AA: strip the Cat6 conductor and clamp the bare copper under the screw. No splice, no ferrule, and do not tin the wire. | |
| 7 | Brown/White | AIN1 | — | Alternator current sensor signal | Terminal 3 (Vout) on the current sensor's 4-pin screw plug | KF2EDGK-5.08-4P-AA: strip the Cat6 conductor and clamp the bare copper under the screw. No splice, no ferrule, and do not tin the wire. | |
| 8 | Brown | GND | — | Ground for the alternator current sensor signal | Terminal 4 (signal ground) on the current sensor's 4-pin screw plug | KF2EDGK-5.08-4P-AA: strip the Cat6 conductor and clamp the bare copper under the screw. No splice, no ferrule, and do not tin the wire. |
Cable 2, Battery Area
RJ5, right port · pins 9–16 (from left to right)
| Required | Pin | Wire (T568B) | Signal | GPIO | Purpose | Connects to | Connector / termination |
|---|---|---|---|---|---|---|---|
| 9 | Orange/White | IN+ INA228 | — | Battery shunt, + side. Keep pins 9 and 10 twisted together all the way to the shunt. Required for the battery voltage correction when the shunt is in the negative lead. | The shunt's + sense screw | HSRR10M-10 multi-stud ring (#10, #8, and #6 in one terminal) crimped straight onto the Cat6 conductor. Fold the stripped end back on itself so the 22–18 barrel grips 24 AWG. Use HSWR6-10 (#6) or HSWR4-10 (#4) for an exact-gauge 26–24 ring on a small screw. No pigtail, one crimp. | |
| 10 | Orange | IN− INA228 | — | Battery shunt, − side. Keep pins 9 and 10 twisted together all the way to the shunt. Required for the battery voltage correction when the shunt is in the negative lead. | The shunt's − sense screw | HSRR10M-10 multi-stud ring (#10, #8, and #6 in one terminal) crimped straight onto the Cat6 conductor. Fold the stripped end back on itself so the 22–18 barrel grips 24 AWG. Use HSWR6-10 (#6) or HSWR4-10 (#4) for an exact-gauge 26–24 ring on a small screw. No pigtail, one crimp. | |
| 11 | Green/White | AIN0 / VBUS | — | Battery + connection, which is the regulator's battery voltage measurement | The battery positive post, or a bus bar bolted to it with no fuse, switch, or shunt between the two | Fuse this wire at the end that taps. 1 A ATO blade fuse (Sherco ATO1A on 12 and 24 V, OptiFuse ANR80-UL-1A on 36 and 48 V) in an 18 AWG in-line holder: Sherco IHWO18 on 12 and 24 V, OptiFuse LPR-02B-18R on 36 and 48 V. Join the regulator-side holder lead to the Cat6 conductor with one HSWSD-10: its small end takes the 24 AWG, its large end the 18 AWG. Ring-terminate the stud-side holder lead with HSRR14-10 (1/4", M6) or HSRR516-10 (5/16", M8), crimped straight onto 18 AWG with no fold-back. | |
| 12 | Blue | GND (AIN3) | — | Ground as shipped: same net as Cable 1 pin 6, factory-shorted to ground by R28. Becomes the spare analog input, and the thermistor's landing point, once R28 is removed. | A thermistor, if you have removed R28; otherwise, spare ground | HSWBS-10 26–24 AWG adhesive heat-shrink butt splice, crimped straight onto the thermistor lead. No step-up, no pigtail. | |
| 13 | Blue/White | AIN2 | — | Reference point only. Please do not connect anything to this wire | Nothing | Cap it. Crimp the wire into one end of an HSWBS-10 and heat it. The adhesive seals the empty end, and the gauge is an exact match. HL8-22-14 is the purpose-made closed-end cap if you would rather have one, though its smallest range is 22–14. | |
| 14 | Green | 5V | — | Spare 5 V power, not for the thermistor (use 3.3 V) | Normally unused | Cap it. Crimp the wire into one end of an HSWBS-10 and heat it. The adhesive seals the empty end, and the gauge is an exact match. HL8-22-14 is the purpose-made closed-end cap if you would rather have one, though its smallest range is 22–14. | |
| 15 | Brown/White | UART RX1 | 7 | Victron VE.Direct receive (RX) wire | The yellow TX conductor in the Victron VE.Direct cable | HSWBS-10 26–24 AWG adhesive heat-shrink butt splice, crimped straight onto the Victron conductor. No step-up, no pigtail. | |
| 16 | Brown | BMSLogic | 42 | BMS on/off control signal. Accepts 5–28 V | The BMS charge-enable or control output | Fuse this wire at the end that taps. 1 A ATO blade fuse (Sherco ATO1A on 12 and 24 V, OptiFuse ANR80-UL-1A on 36 and 48 V) in an 18 AWG in-line holder: Sherco IHWO18 on 12 and 24 V, OptiFuse LPR-02B-18R on 36 and 48 V. Join the regulator-side holder lead to the Cat6 conductor with one HSWSD-10: its small end takes the 24 AWG, its large end the 18 AWG. The holder’s other lead is 18 AWG tinned marine wire and carries on to the source. Add HSRSD-10 at that end only if you are standardizing the boat on 16 AWG. |
Cable 3, Network Electronics (Victron / BMS / NMEA)
RJ3, left port · pins 1–8 (from left to right)
| Required | Pin | Wire (T568B) | Signal | GPIO | Purpose | Connects to | Connector / termination |
|---|---|---|---|---|---|---|---|
| 1 | Orange/White | UART RX1 | 7 | Victron VE.Direct receive (RX) wire, alternate connection point | The yellow TX conductor in the Victron VE.Direct cable | HSWBS-10 26–24 AWG adhesive heat-shrink butt splice, crimped straight onto the Victron conductor. No step-up, no pigtail. | |
| 2 | Orange | 5V | — | Convenient 5 V source for the spare input, HIGH/LOW, and FORCEFLOAT (pins 3, 5, 7) | The common side of the panel switches for pins 3, 5 and 7 | HSWSD-10 crimped straight onto 18 AWG tinned marine wire in one splice; its large end takes 22–18 AWG. Add HSRSD-10 after it only if you are standardizing the boat on 16 AWG. | |
| 3 | Green/White | OPT GPIO1 | 8 | Spare isolated input. Apply any voltage 5–28 V; function not yet defined | A maintained panel switch fed from pin 2 (see Control Switches) | HSWSD-10 crimped straight onto 18 AWG tinned marine wire, then HSBFN-10 for the switch's 0.250" blade. Add HSRSD-10 between them only if you are standardizing on 16 AWG. | |
| 4 | Blue | UART RX2 | 6 | NMEA0183 receive (RX) wire | The TX conductor from the NMEA 0183 source device | HSWBS-10 26–24 AWG adhesive heat-shrink butt splice, crimped straight onto the source device's signal conductor. No step-up, no pigtail. | |
| 5 | Blue/White | HIGH/LOW | 39 | Apply any voltage 5–28 V for the faster charging mode. Acts only while Physical Panel Override is on | A maintained panel switch fed from pin 2 (see Control Switches) | HSWSD-10 crimped straight onto 18 AWG tinned marine wire, then HSBFN-10 for the switch's 0.250" blade. Add HSRSD-10 between them only if you are standardizing on 16 AWG. | |
| 6 | Green | IGNITION | 1 | Connect to the engine ignition. Wakes WiFi and all functions | A switched ignition or run source on the engine harness | Fuse this wire at the end that taps. 1 A ATO blade fuse (Sherco ATO1A on 12 and 24 V, OptiFuse ANR80-UL-1A on 36 and 48 V) in an 18 AWG in-line holder: Sherco IHWO18 on 12 and 24 V, OptiFuse LPR-02B-18R on 36 and 48 V. Join the regulator-side holder lead to the Cat6 conductor with one HSWSD-10: its small end takes the 24 AWG, its large end the 18 AWG. The holder’s other lead is 18 AWG tinned marine wire and carries on to the source. Add HSRSD-10 at that end only if you are standardizing the boat on 16 AWG. | |
| 7 | Brown/White | FORCEFLOAT | 40 | Apply any voltage 5–28 V for maintain-voltage mode (zero net battery current). Acts only while Physical Panel Override is on | A maintained panel switch fed from pin 2 (see Control Switches) | HSWSD-10 crimped straight onto 18 AWG tinned marine wire, then HSBFN-10 for the switch's 0.250" blade. Add HSRSD-10 between them only if you are standardizing on 16 AWG. | |
| 8 | Brown | GPIO0 | 0 | Programming mode only: short to GND before power-up, then flash over USB (usually unnecessary) | Nothing in a normal installation | Cap it. Crimp the wire into one end of an HSWBS-10 and heat it. The adhesive seals the empty end, and the gauge is an exact match. HL8-22-14 is the purpose-made closed-end cap if you would rather have one, though its smallest range is 22–14. |
Cable 4, Control Switches
RJ3, right port · pins 9–16 (from left to right) · all inputs active-low
| Required | Pin | Wire (T568B) | Signal | GPIO | Purpose | Connects to | Connector / termination |
|---|---|---|---|---|---|---|---|
| 9 | Orange/White | FactoryReset | 41 | Ground this wire to run the factory firmware. User settings and WiFi setup are retained | A maintained panel switch back to pin 16 (see Control Switches) | HSWSD-10 crimped straight onto 18 AWG tinned marine wire, then HSBFN-10 for the switch's 0.250" blade. Add HSRSD-10 between them only if you are standardizing on 16 AWG. | |
| 10 | Orange | WakeFromSleep | 5 | Ground this wire to wake WiFi with the engine off, for example to check battery state of charge at anchor | A maintained panel switch back to pin 16 (see Control Switches) | HSWSD-10 crimped straight onto 18 AWG tinned marine wire, then HSBFN-10 for the switch's 0.250" blade. Add HSRSD-10 between them only if you are standardizing on 16 AWG. | |
| 11 | Green/White | WifiReset | 45 | Ground this wire to reset WiFi passwords and serve the WiFi config page | A maintained panel switch back to pin 16 (see Control Switches) | HSWSD-10 crimped straight onto 18 AWG tinned marine wire, then HSBFN-10 for the switch's 0.250" blade. Add HSRSD-10 between them only if you are standardizing on 16 AWG. | |
| 12 | Blue | AP/ClientMode | 46 | Ground this wire to make the regulator its own hotspot (AP mode) instead of using the ship's WiFi | A maintained panel switch back to pin 16 (see Control Switches) | HSWSD-10 crimped straight onto 18 AWG tinned marine wire, then HSBFN-10 for the switch's 0.250" blade. Add HSRSD-10 between them only if you are standardizing on 16 AWG. | |
| 13 | Blue/White | RESET | — | Ground this wire to hold the regulator in reset; flip the switch on and back off to reboot it | A maintained panel switch back to pin 16 (see Control Switches) | HSWSD-10 crimped straight onto 18 AWG tinned marine wire, then HSBFN-10 for the switch's 0.250" blade. Add HSRSD-10 between them only if you are standardizing on 16 AWG. | |
| 14 | Green | ON/OFF | — | Ground this wire to shut off the alternator field. This is pure hardware, not software-dependent in any way | A maintained panel switch back to pin 16 (see Control Switches) | HSWSD-10 crimped straight onto 18 AWG tinned marine wire, then HSBFN-10 for the switch's 0.250" blade. Add HSRSD-10 between them only if you are standardizing on 16 AWG. | |
| 15 | Brown/White | Buzzer + | 21 | 5 V output for an external buzzer or alarm, current-limited to ~250 mA | The buzzer's + lead; the buzzer's − lead returns to pin 16 | HSWSD-10 step-down butt splice crimped straight onto the buzzer's lead: one crimp, and it takes any buzzer lead from 22 to 18 AWG. | |
| 16 | Brown | GND | — | Shared ground return for all the switches and the buzzer above (pins 9–15) | The common ground point for every Cable 4 switch, and the buzzer − | HSWSD-10 crimped straight onto 18 AWG tinned marine wire in one splice; its large end takes 22–18 AWG. Add HSRSD-10 after it only if you are standardizing the boat on 16 AWG. |
Patch cables are wired to one of two color standards, and cheap cables may follow neither:
- T568B (this documentation): the common factory default. Roughly 90% of patch cables in the US are wired T568B, so this is almost certainly what you have.
- T568A: an older alternate standard that swaps the orange and green pairs. On a T568A cable the colors at pins 1, 2, 3 and 6 differ (the blue and brown pairs are the same on both). Use the T568A color map.
- Non-standard cables: some budget cables only guarantee end-to-end continuity and use arbitrary internal colors.
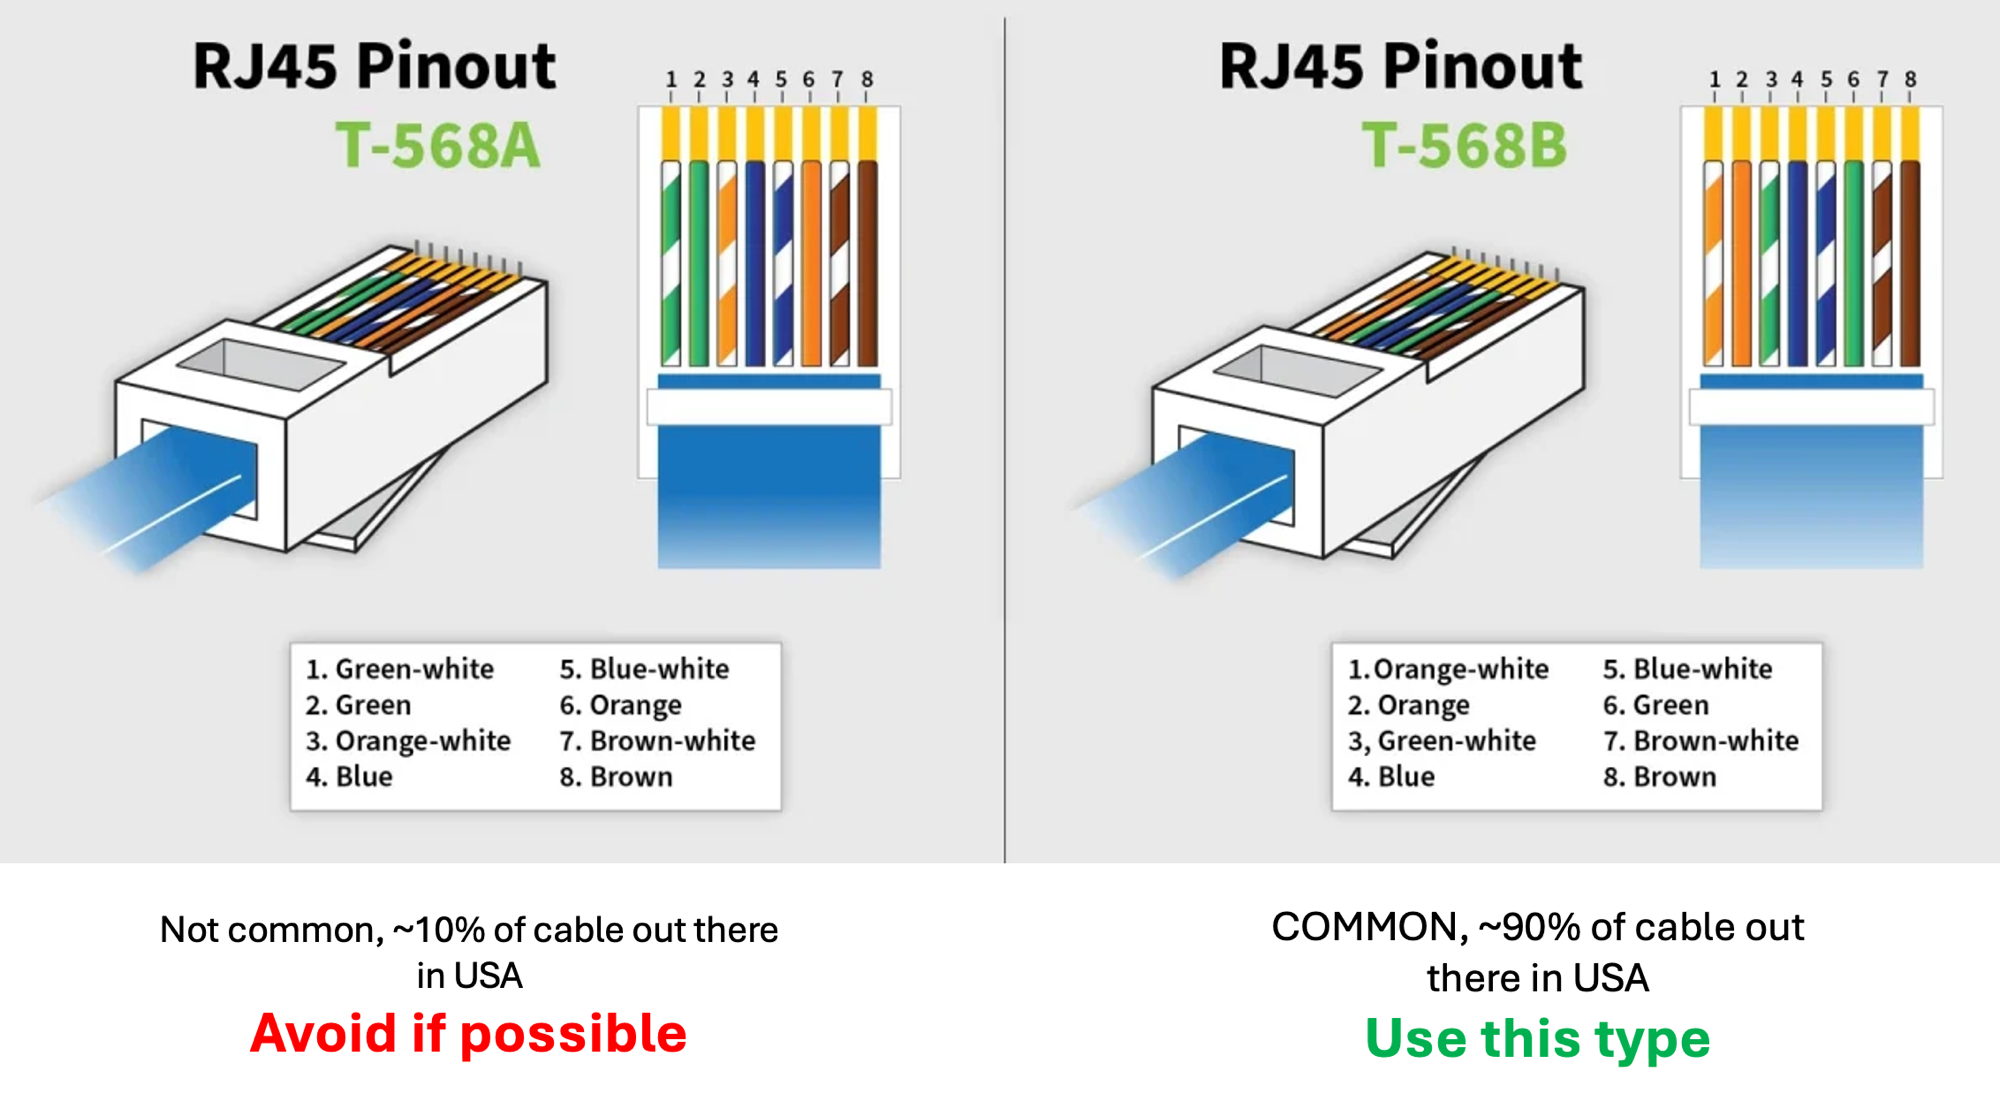
The signal on each pin is set by the XREG-010's jack; the wire color is only a label to help you find the right conductor. Always confirm by pin position at the plug, not by color. To read pin 1: hold the RJ45 plug with the gold contacts facing you and the cable pointing up (locking tab at the back), and pin 1 is the leftmost contact, pin 8 the rightmost. If pin 1 is orange/white the cable is T568B; if pin 1 is green/white it is T568A.
This matters because a 12 V signal on the wrong pin can destroy the board. The solid orange wire is the 5 V output (pin 2) on a T568B cable but the IGNITION input (pin 6) on a T568A cable. Putting your ignition 12 V on the wrong one back-feeds the 5 V rail and damages the regulator.
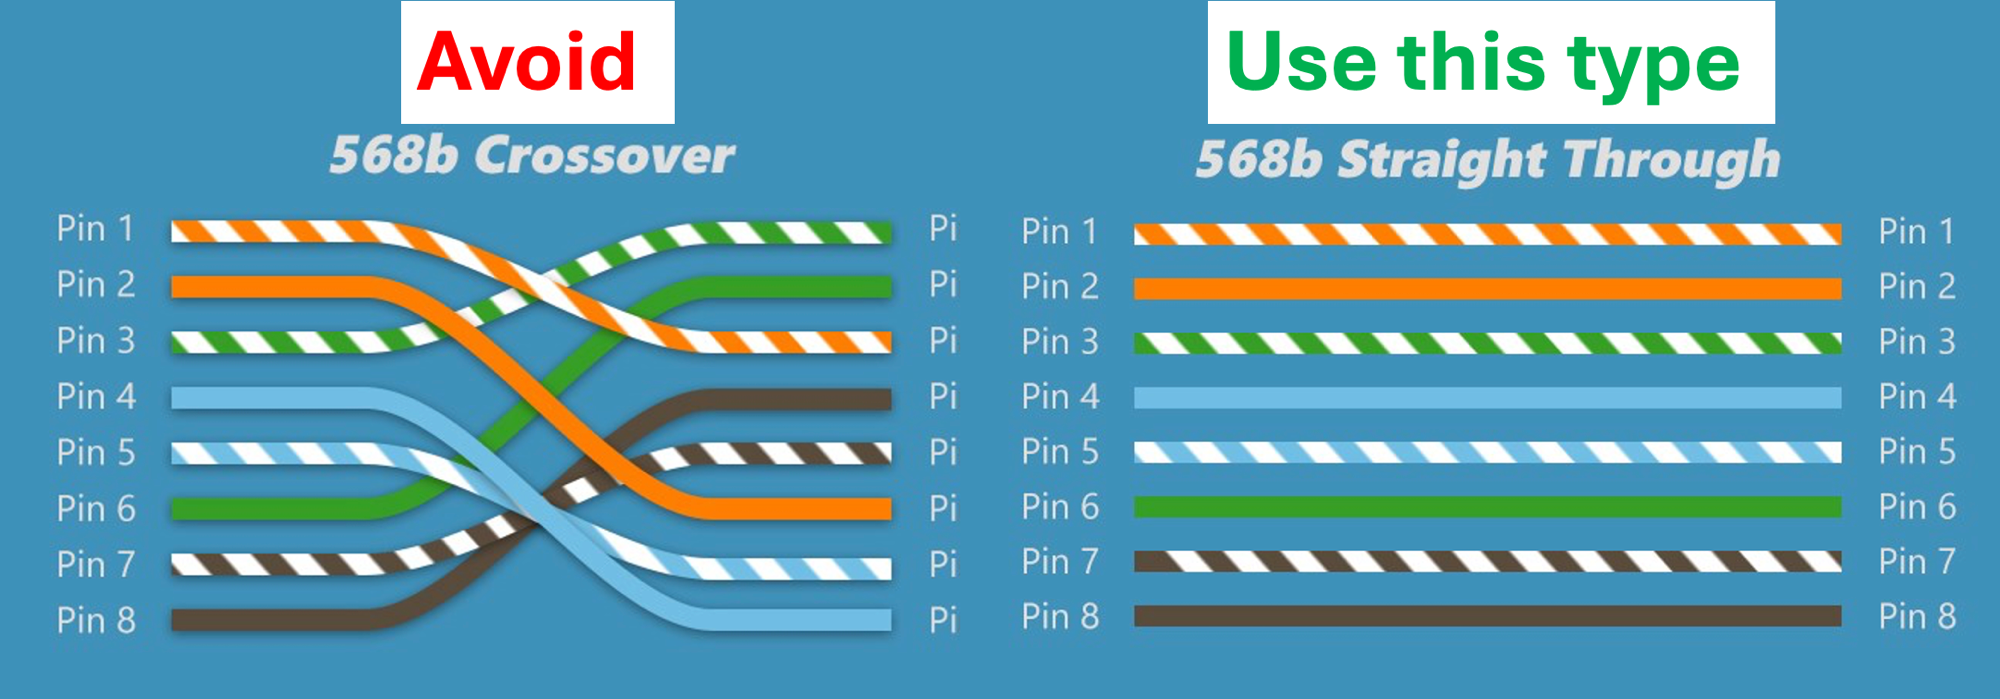
Use a straight-through cable, where pin 1 at one end connects to pin 1 at the other, pin 2 to pin 2, and so on. Avoid a crossover cable, which deliberately swaps the orange and green pairs between its two ends. The wire carrying a given signal is then different depending on which end you cut from, and one half of the cable will not match this documentation.
Crossover cables are largely obsolete (modern network gear self-corrects with Auto-MDIX) but they are still sold and still turn up in parts bins and old kits, so confirm before cutting. The simplest check: hold both RJ45 plugs side by side, contacts toward you. On a straight-through cable the eight colors appear in the same left-to-right order on both ends; on a crossover they do not.
Shielded (STP/FTP) cable is optional. If you use it, the four RJ45 jacks have metal shells and those shells are bonded to board ground. Plugging in a shielded cable grounds its foil and drain at the regulator, which is good.
At the cut end, trim the foil and drain wire back and insulate them. Do not land the drain on the alternator case, the shunt, a battery negative, or any other ground. A shield grounded at both ends is a second path between two points already connected through the boat's DC negative, and it will carry whatever current the difference between them drives, including charging current on the alternator run.
Put a generous amount of dielectric grease in each RJ45 jack and on each male plug before plugging in, and on the power/field/gnd terminals, both the screw side and the plug side. Grease blocks moisture, slows corrosion, and does not interfere with the connection.
The board is conformally coated and resists splash; greased connections are cheap insurance against salt water accidents in a non-IP rated device.
Sherco's 26–24 AWG range covers butt splices, step-downs and small ring terminals, so a sensor lead, a shunt sense screw, a battery stud and a Victron conductor are each one crimp away from the Cat6 conductor. No pigtail, no chain of adapters.
Bigger rings. Where a stud takes a bigger ring than the 26–24 range offers (#8 and up, and the multi-stud terminals), fold the stripped conductor back on itself and crimp it into a 22–18 barrel. Doubled 24 AWG lands squarely in that range and grips far better than a single conductor rattling around in an oversized barrel. This is about getting a mechanically sound crimp, not about wire sizing (see how this sits with ABYC E-11).
If you would rather not fold. The 22 AWG upgrade is an exact fit for a 22–18 barrel as it comes, and a bigger conductor is easier to strip and handle in the first place. On that cable every termination on this page uses the 22–18 part directly, and none of the 26–24 white parts apply. It costs about $110 more for a boat.
The four runs that do become boat wire, because they end at panel hardware sized for it: the switch wires (Cable 3 pins 3, 5 and 7; Cable 4 pins 9, 10, 11, 12, 13, 14 and 16), the ignition wire (Cable 3 pin 6), the 5 V switch feed (Cable 3 pin 2) and the BMS control wire (Cable 2 pin 16). There, HSWSD-10 goes straight onto 18 AWG in one splice. The switches listed on Control Switches carry milliamps, so 18 AWG is the largest wire any of them needs.
Two standards apply on a boat and they are complementary. ABYC E-11 governs the vessel's AC and DC electrical system: the circuits the installer sizes and protects. NMEA 0400 is the marine electronics installation standard, and it is the one with sections on data interfacing and Ethernet networking. Data and signal cabling for a piece of electronic equipment has always lived on the NMEA 0400 side, which is why a boat full of NMEA 2000 drops, VE.Direct leads and Cat6 to an MFD is not somehow non-compliant. Both are voluntary standards.
Where E-11 does speak to wire size, it sets 16 AWG as the general minimum and permits 18 AWG only in named cases, among them conductors inside a sheath that do not run more than 30 inches outside it, and circuits under 60 V carrying less than 3 amps in communication, electronic navigation and electronic equipment. These cables are 24 AWG, under that floor. Nothing done at the end of the wire changes it: stepping up to 18 AWG at a panel switch, and folding the conductor into a 22–18 barrel, are both about getting a mechanically sound crimp. The circuit is 24 AWG for its whole length either way.
Four conductors do tap a source of power outside the regulator: battery, stator, ignition, and the BMS output. Those carry a 1 A in-line fuse at the tap, called out in their rows above. E-11's ampacity tables stop at 18 AWG, so the value is sized against NEC Table 725.144, which rates a 24 AWG conductor in a single 4-pair cable at 2.0 A.
What makes these cables sit between the two standards is that you cut a patch cable and terminate the far end yourself, onto the boat's own hardware, so it is not purely a factory assembly. Every signal here carries milliamps and stays inside the jacket for its whole run.
Use stranded Cat6, not solid-core in-wall cable. E-11 requires stranded copper, because solid conductors work-harden and break under vibration. Patch cable is stranded by construction, and the cable recommended on Unboxing is 24 AWG stranded pure copper.
The Min. column ticks the connections a minimal installation needs: the alternator temperature sensor, current sensor and stator (tachometer) wire on Cable 1, battery voltage on Cable 2 pin 11, and ignition on Cable 3 pin 6, alongside the power, ground, and field wires on the green terminal.
Everything unticked adds a feature rather than enabling the regulator.
There is a setting for running without a shunt, and the regulator regulates fine.
Without it you lose state of charge and the low-charge alarm, the battery-current limit and its alarm, float and maintain modes, battery health, and several of the fast protections, load-dump detection among them.
Absorption also ends on a timer instead of on tail current, because tail current is a battery-current measurement.